After connecting and importing your data into Pagos, you may notice slight differences between Pagos and your processor’s reports. If reconciliation reveals discrepancies you can’t account for, submit a Data Audit Request.
Step 1 - Configure Reports in Your Adyen Account
Log into your Adyen account to configure a set of automatic reports:1
Click the company name in the top-left corner of the page, then select the first merchant account from the drop-down menu. This is vital, as these reports are enabled per merchant account and give us the ability to capture the maximum number of details.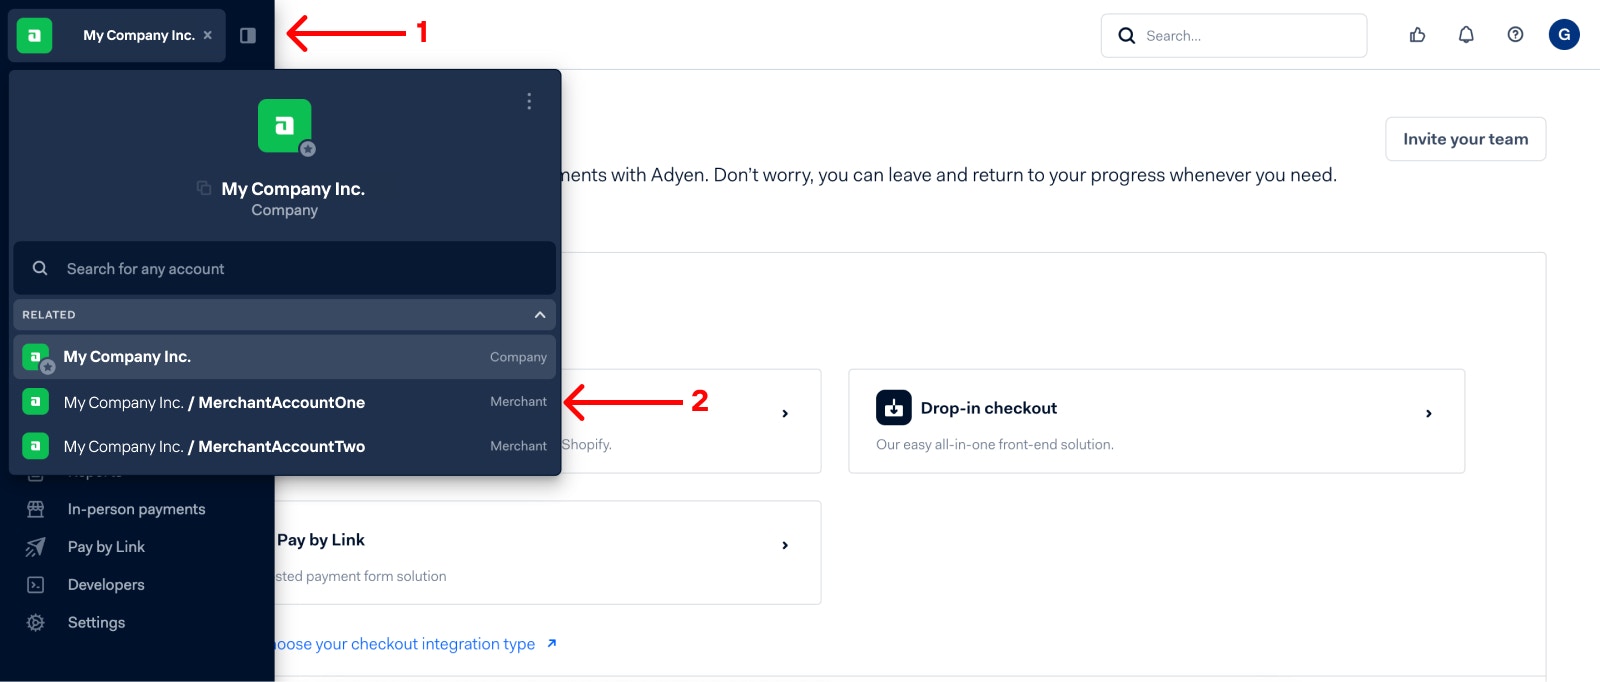
2
Click Reports in the left-side navigation panel.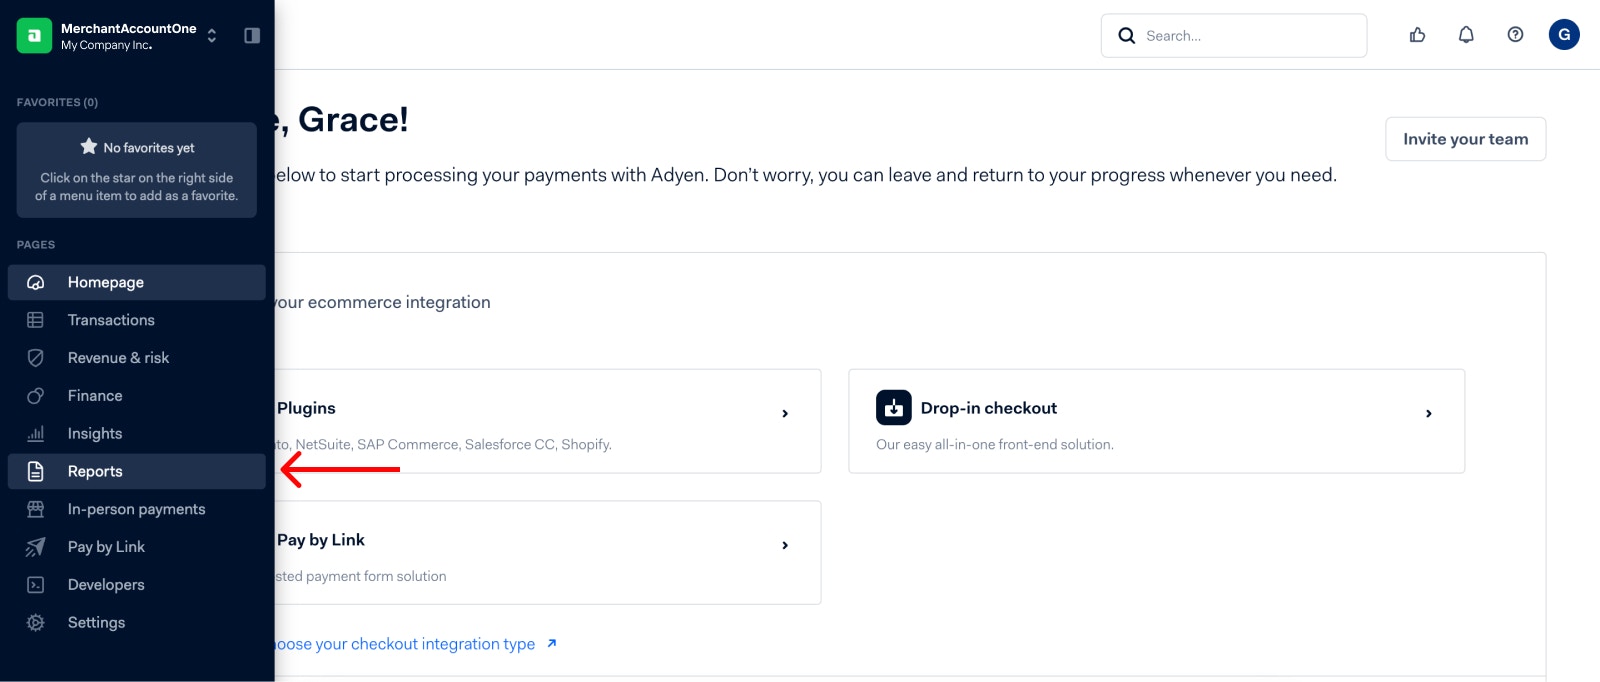
3
Use the search bar to search for each of the following reports one at a time:
- 3D Secure Authentication
- 3DS Authentication
- Aggregate settlement details
- Dispute transaction details
- Interchange and Scheme Fee report
- Payment Accounting
- Received payment details
- Settlement details
4
Click Generate beside each report, then click Automated (generate on schedule). Turn Automatic generation on and select .CSV for the File type.
Optional Step: Collect and Provide Network Token Information
If you provision and collect network tokens through Adyen, you also have the option of receiving additional data on the network tokens you process. If you want to collect this data and subsequently send it to your Pagos accounts, you must follow the steps outlined in Adyen’s documentation to collect more information on network tokens.
Step 2 - Create a Report User in Your Adyen Account
1
Click the company name in the top-left corner of the page, then navigate to the company level for your account.
2
Follow the instructions outlined in Adyen’s documentation to create a new API credential in your Adyen account for use in your Pagos account.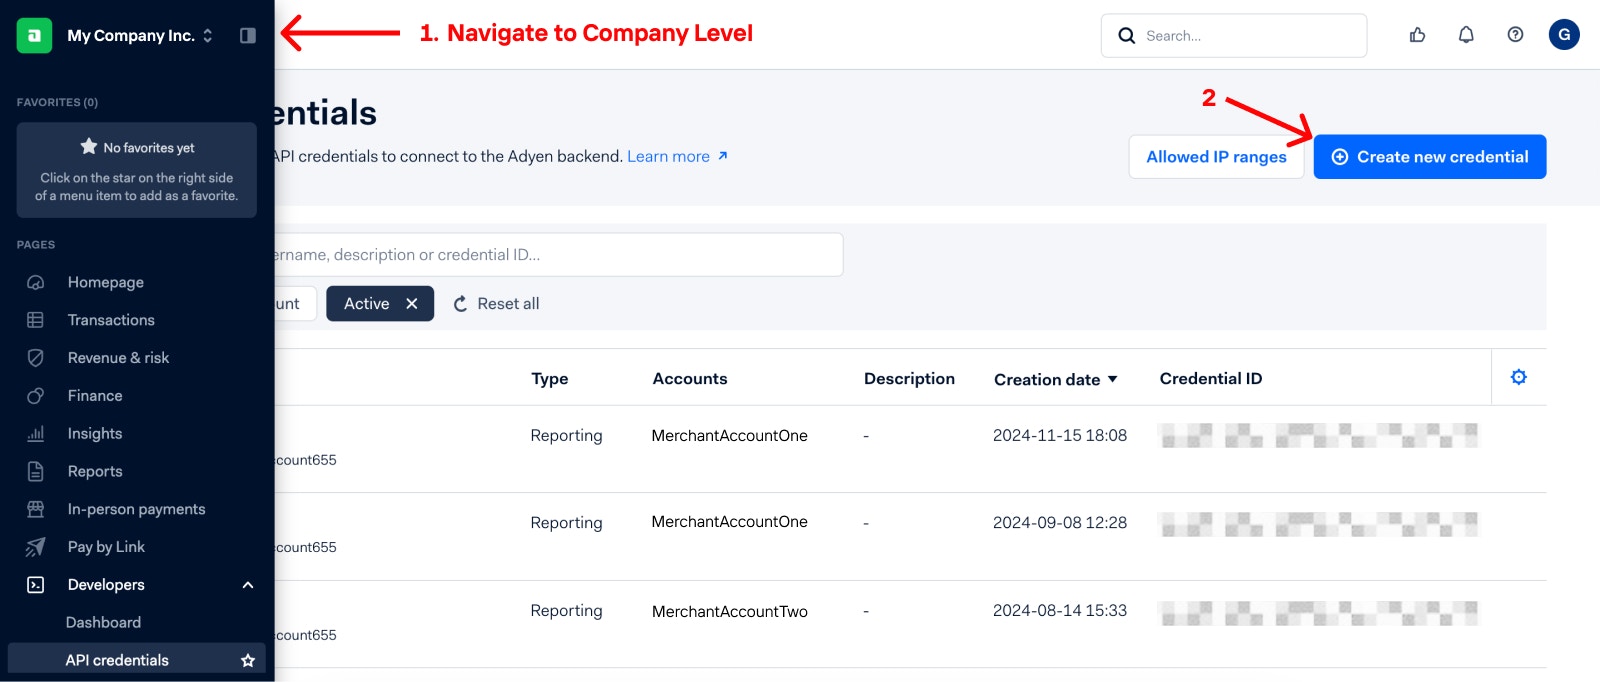
3
For the Credential type, select Report service user, then click Create credential.
4
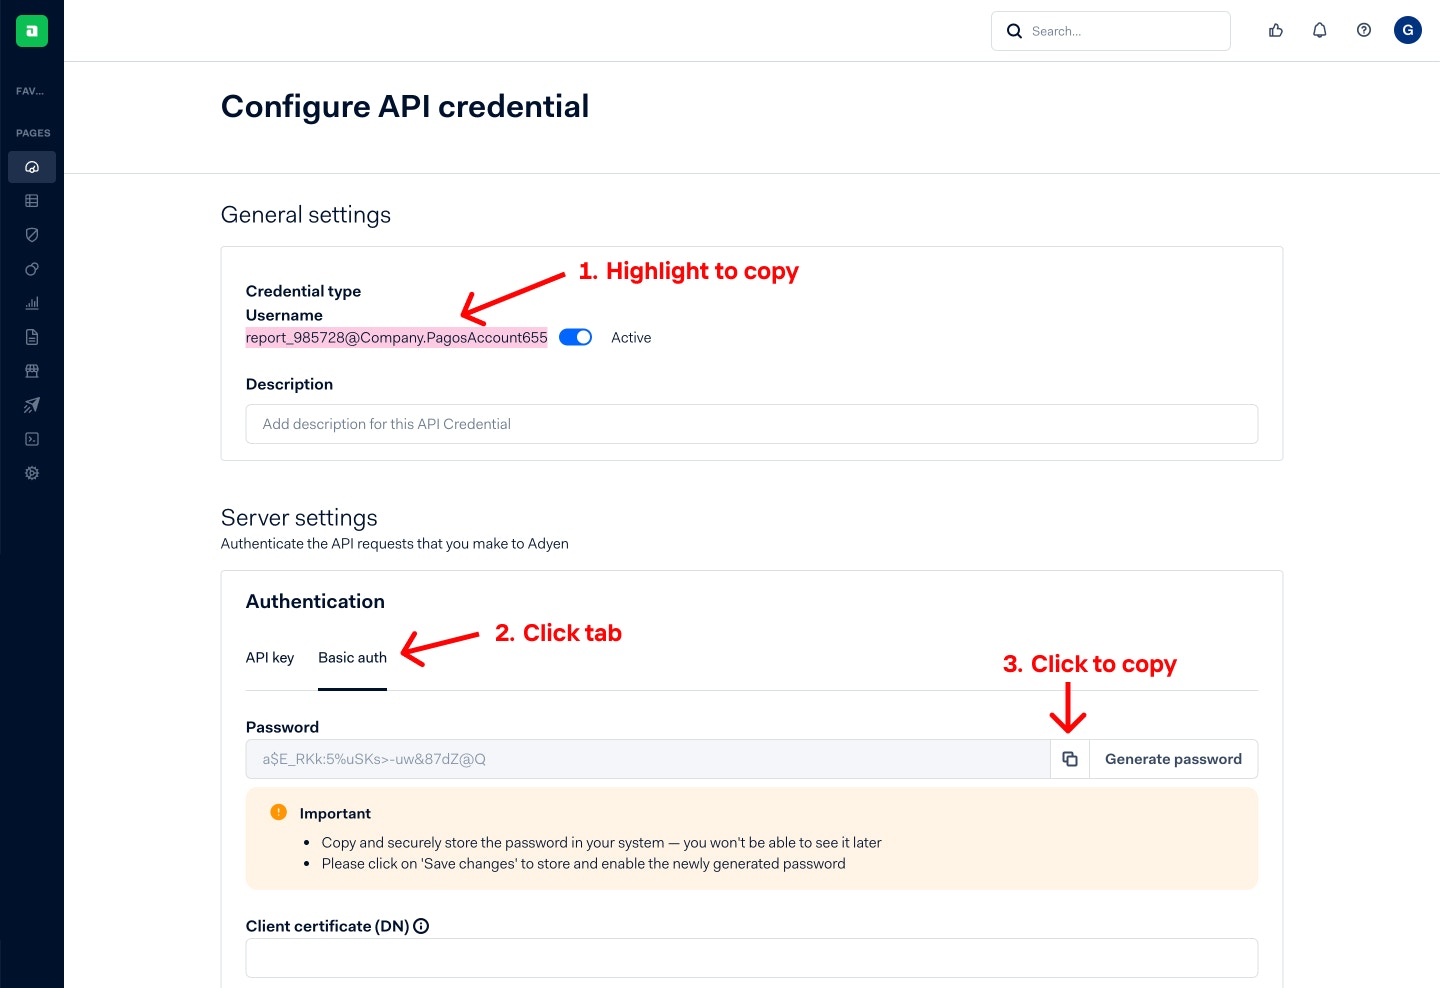
Save the following information for future use:
- General settings, highlight the Username, then compy and paste it somewhere secure
-
Under Server settings, click the Basic Auth tab and save the Password
5
Scroll down to the Accounts section at the bottom of the page, then click the expansion arrow to the right of the section. Select Company account and all associated merchant accounts.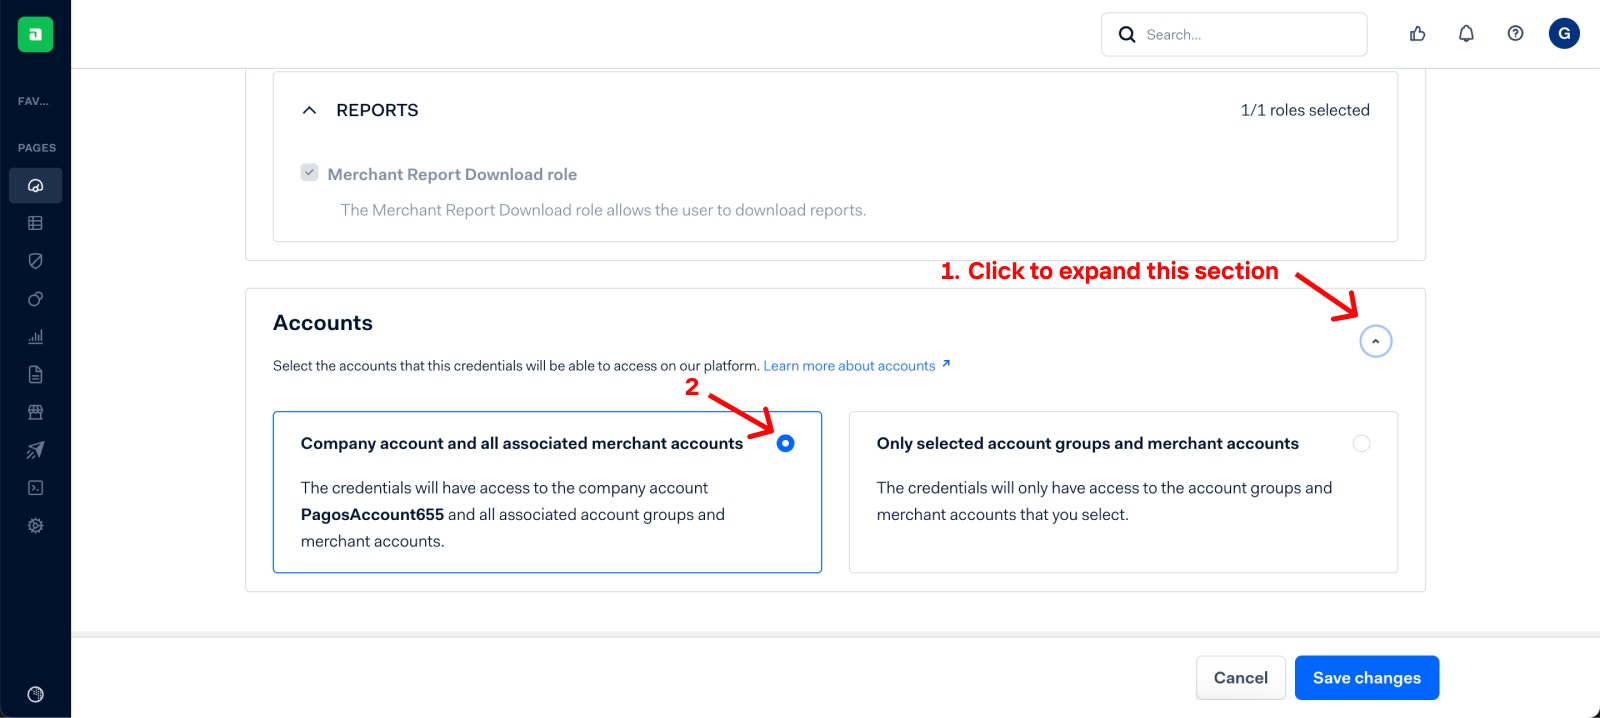
6
Click Save changes.
Step 3 - Add a New Data Connection to Your Pagos Account
To pull in Adyen data to Pagos, you’ll need to add a new data connection in your Pagos account:2
Click the settings icon in the top-right corner of the page.
3
Under Data Connections, click Connections.
4
Click Add Data Connection.
5
In the side panel that opens, click the Provider drop-down, then select Adyen.
6
Fill in the following fields:
7
Click Add Data Connection.
Step 4 - Create a Webhook
After you enter your Adyen details in the Data Connections page and click Add Data Connection, you’ll be prompted to create a webhook. Click the copy icon beside Webhook Destination, then click Complete Webhook Set-Up. Next, log into your Adyen account to create the webhook:1
In your Adyen control panel, go now to the company level view by clicking the company name in the top-left corner of the page. This will allow you to configure one webhook for all applicable MIDs at the company level.
2
Click Developers, then click Webhooks.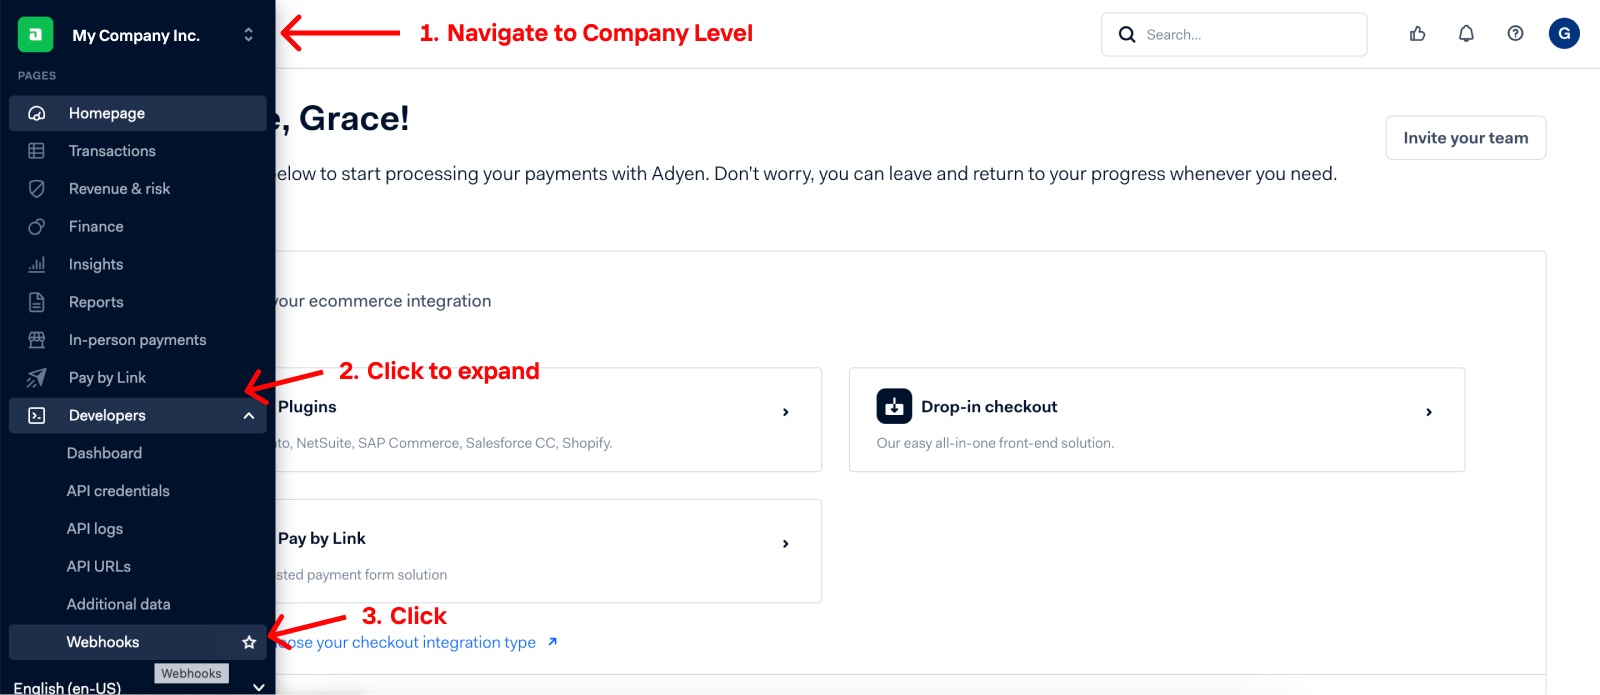
3
Click Create new webhook in the top right of the page to create a new webhook. Keep in mind, you don’t need to make any changes to your existing webhooks.
4
Beside Standard webhook, click Add.
5
Under General, click the Merchant accounts drop-down menu, then select the MIDs to connect in your Adyen control panel. You can specify to include ‘all’ or only individual MIDs. These should the same that were configured in step 1.
6
Under Server configuration, paste the destination URL you copied from your Pagos account into the URL field.
7
Under Additional settings, click the checkbox beside each of the following options:
-
Under 3D Secure:
- Include 3D Secure Result
- Include 3D Secure Version
- Include 3D Secure2 Challenge Flow Information Details
- Include Metadata in payment notification for 3D Secure payments (notifications are not sent from Pal)
- Include Raw 3D Secure Details Result
- Include Raw 3D Secure Result
-
Under Acquirer:
- Add Acquirer Result
- Add Payment Account Reference
- Add Raw Acquirer Result
- Include Acquirer Error Details
- Include Acquirer Reference
- Include ARN
- Include Custom Routing Flagging
- Include the acquirer, acquirer account, raw response, and response code of the retry attempts (we use this information to determine if a transaction was made with a network token)
-
Under Card:
- Include Card Bin
- Include card info for recurring contract notifications
- Include detailed Card BIN Information
- Include Extra Costs
- Include Funding Source
- Include Issuer Country
- Include Shopper Country
- Include Shopper Details
- Include Subvariant
- Include the co-brand card information
- Return AVS data
-
Under Payment:
- Include Authorized Amount (dynamic zero auth)
- Include ESD validation result
- Include Shopper Interaction
- Include the bin and summary information for network tokens in the case of tokenised payments
- Include zero auth flag
-
Under Risk:
- Add capture reference to dispute event
- Add Visa Rapid Dispute Resolution (RDR) indicator to dispute events
- Include Device Type and Browser Information
- Include Dunning Project Data
- Include Gross Currency Chargeback Details
- Include notes in manual review notifications
- Include Risk Data
- Include Risk Experiment Reference (notifications are not sent from Pal)
- Include Risk Profile (notifications are not sent from Pal)
- Include Risk Profile Reference (notifications are not sent from Pal)
- Include the originalReference for CHARGEBACK_REVERSED notifications
8
Click Test configuration to test the webhook, then click Save configuration.
9
Click the toggle next to your new webhook to turn it on.
Connecting Additional MIDs
After you complete your Adyen data connection, you may decide down the line to connect more Adyen MIDs to your Pagos account. To do so:1
Log into your Adyen account.
2
Click the company name in the top-left corner of the page, then select the proper merchant account from the drop-down menu.
3
Click Reports in the left-side navigation panel.
4
For each of the following reports, click the name of the report to open its settings; click Manage report, then Automatic (generate on as schedule). Turn Automatic generation on and select .CSV for the File type:
- 3D Secure Authentication (daily)
- 3DS Authentication (weekly)
- Aggregate settlement details (daily)
- Dispute transaction details (daily)
- Interchange and Scheme Fee report (monthly)
- Payment Accounting Report (daily)
- Received payment details (daily)
- Settlement details (daily)
You don’t need to make any changes to the data connection in your Pagos account.