> ## Documentation Index
> Fetch the complete documentation index at: https://docs.pagos.ai/llms.txt
> Use this file to discover all available pages before exploring further.
# Connect to Stripe
This guide outlines the necessary steps to connect your Pagos and Stripe accounts. There are two ways to connect:
* [**OAuth**](#oauth-method-recommended) (recommended)
* [**API Key**](#api-key-method)
For more information on connecting Pagos to other payment processors, see our [Connecting Your Payment Processors to Pagos](/importing-data/connecting-your-payment-processors-to-pagos) guide.
**Sensitive Data Warning**:
Never include sensitive customer data in the metadata fields passed to Pagos.
## OAuth Method (Recommended)
Stripe OAuth is the easiest and recommended way to connect your Stripe and Pagos accounts. This method uses Stripe's secure authorization flow, so you don't need to create or manage API keys manually.
[Log into your Pagos account](https://secure.pagos.ai/sign-in).
Click the **settings** icon in the top-right corner of the page.
Under **Data Connections**, click **Connections**.
Click **Add Data Connection**.
In the side panel that opens, click the **Processor** drop-down menu, then click **Stripe**.
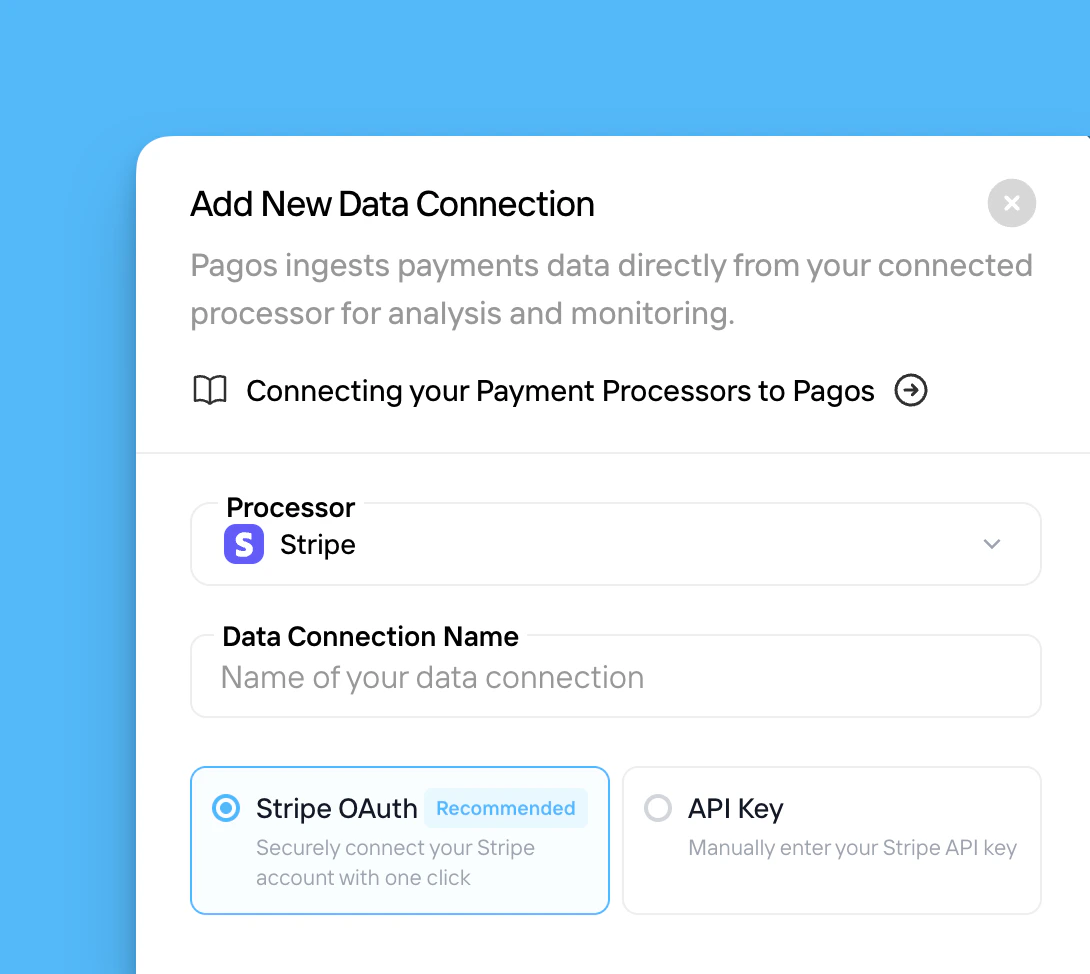 Enter a **Data Connection Name** of your choice; this value is used for display and identification on data visualizations within Pagos Insights.
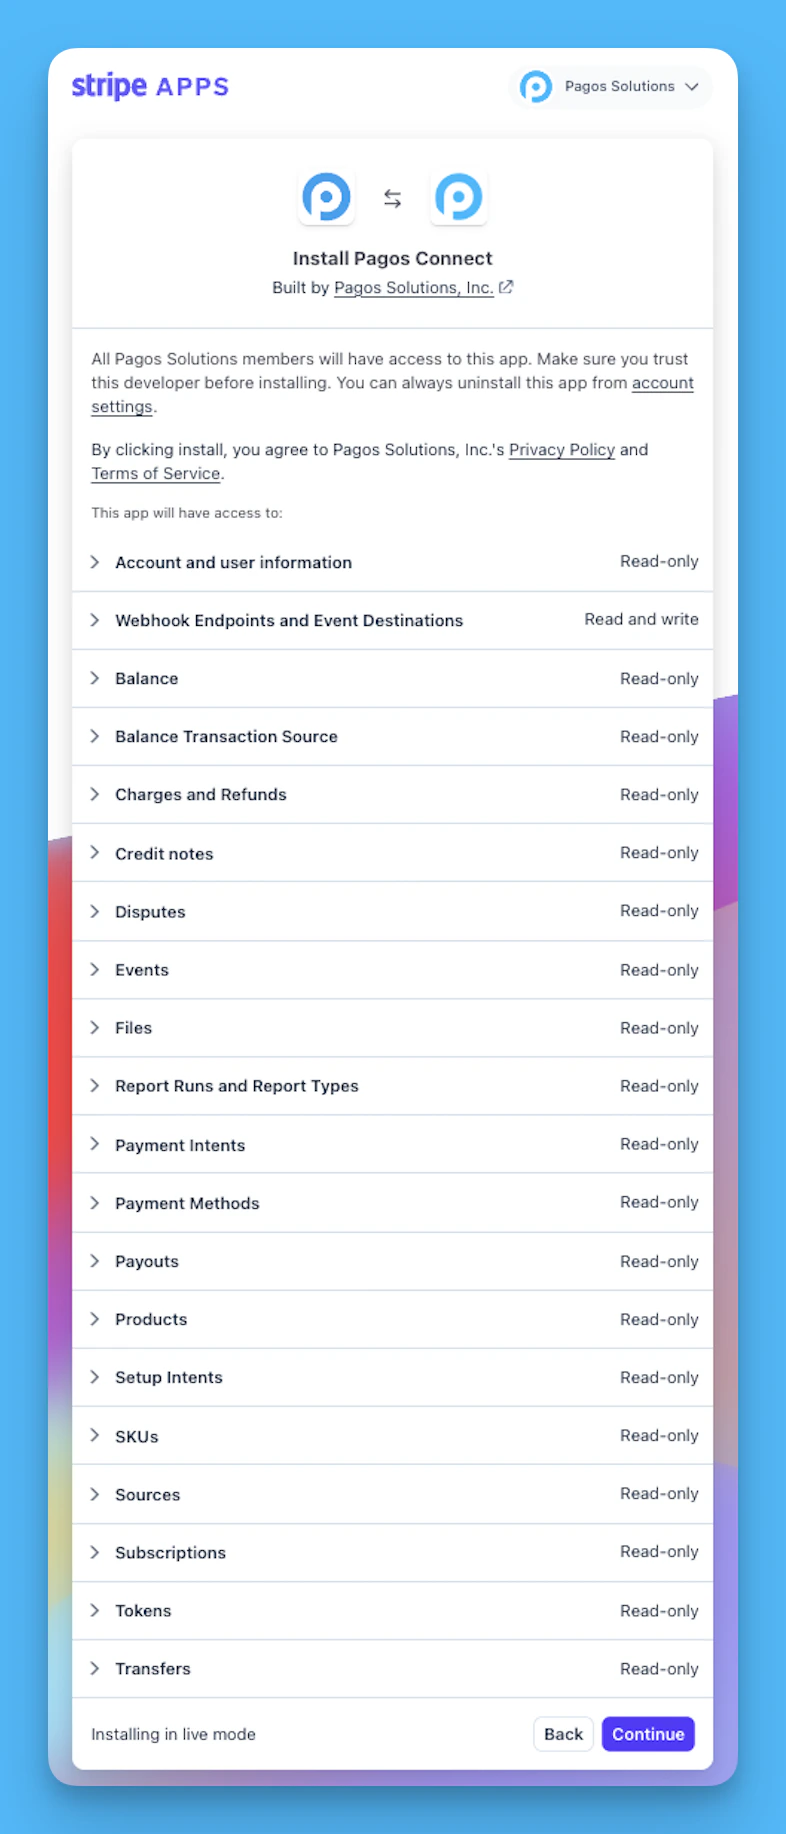
Click the **Stripe OAuth** box, then click **Connect with Stripe** in the bottom-left corner of the side panel. You'll be redirected to Stripe's authorization page.
Log into your Stripe account (if you're not already logged in) and authorize Pagos to access your account. Once authorized, you'll be redirected back to Pagos and the connection will be complete.
Enter a **Data Connection Name** of your choice; this value is used for display and identification on data visualizations within Pagos Insights.
Click the **Stripe OAuth** box, then click **Connect with Stripe** in the bottom-left corner of the side panel. You'll be redirected to Stripe's authorization page.
Log into your Stripe account (if you're not already logged in) and authorize Pagos to access your account. Once authorized, you'll be redirected back to Pagos and the connection will be complete.
 ## API Key Method
You can also connect your Stripe and Pagos accounts using a restricted API key. This method requires you to manually create an API key in the Stripe dashboard and enter it in Pagos.
### Step 1 – Create a Restricted API Key in Your Stripe Account
For added data security, use a restricted API key to connect your Stripe and Pagos accounts. If you don't already have one, you'll need to create one in the Stripe dashboard:
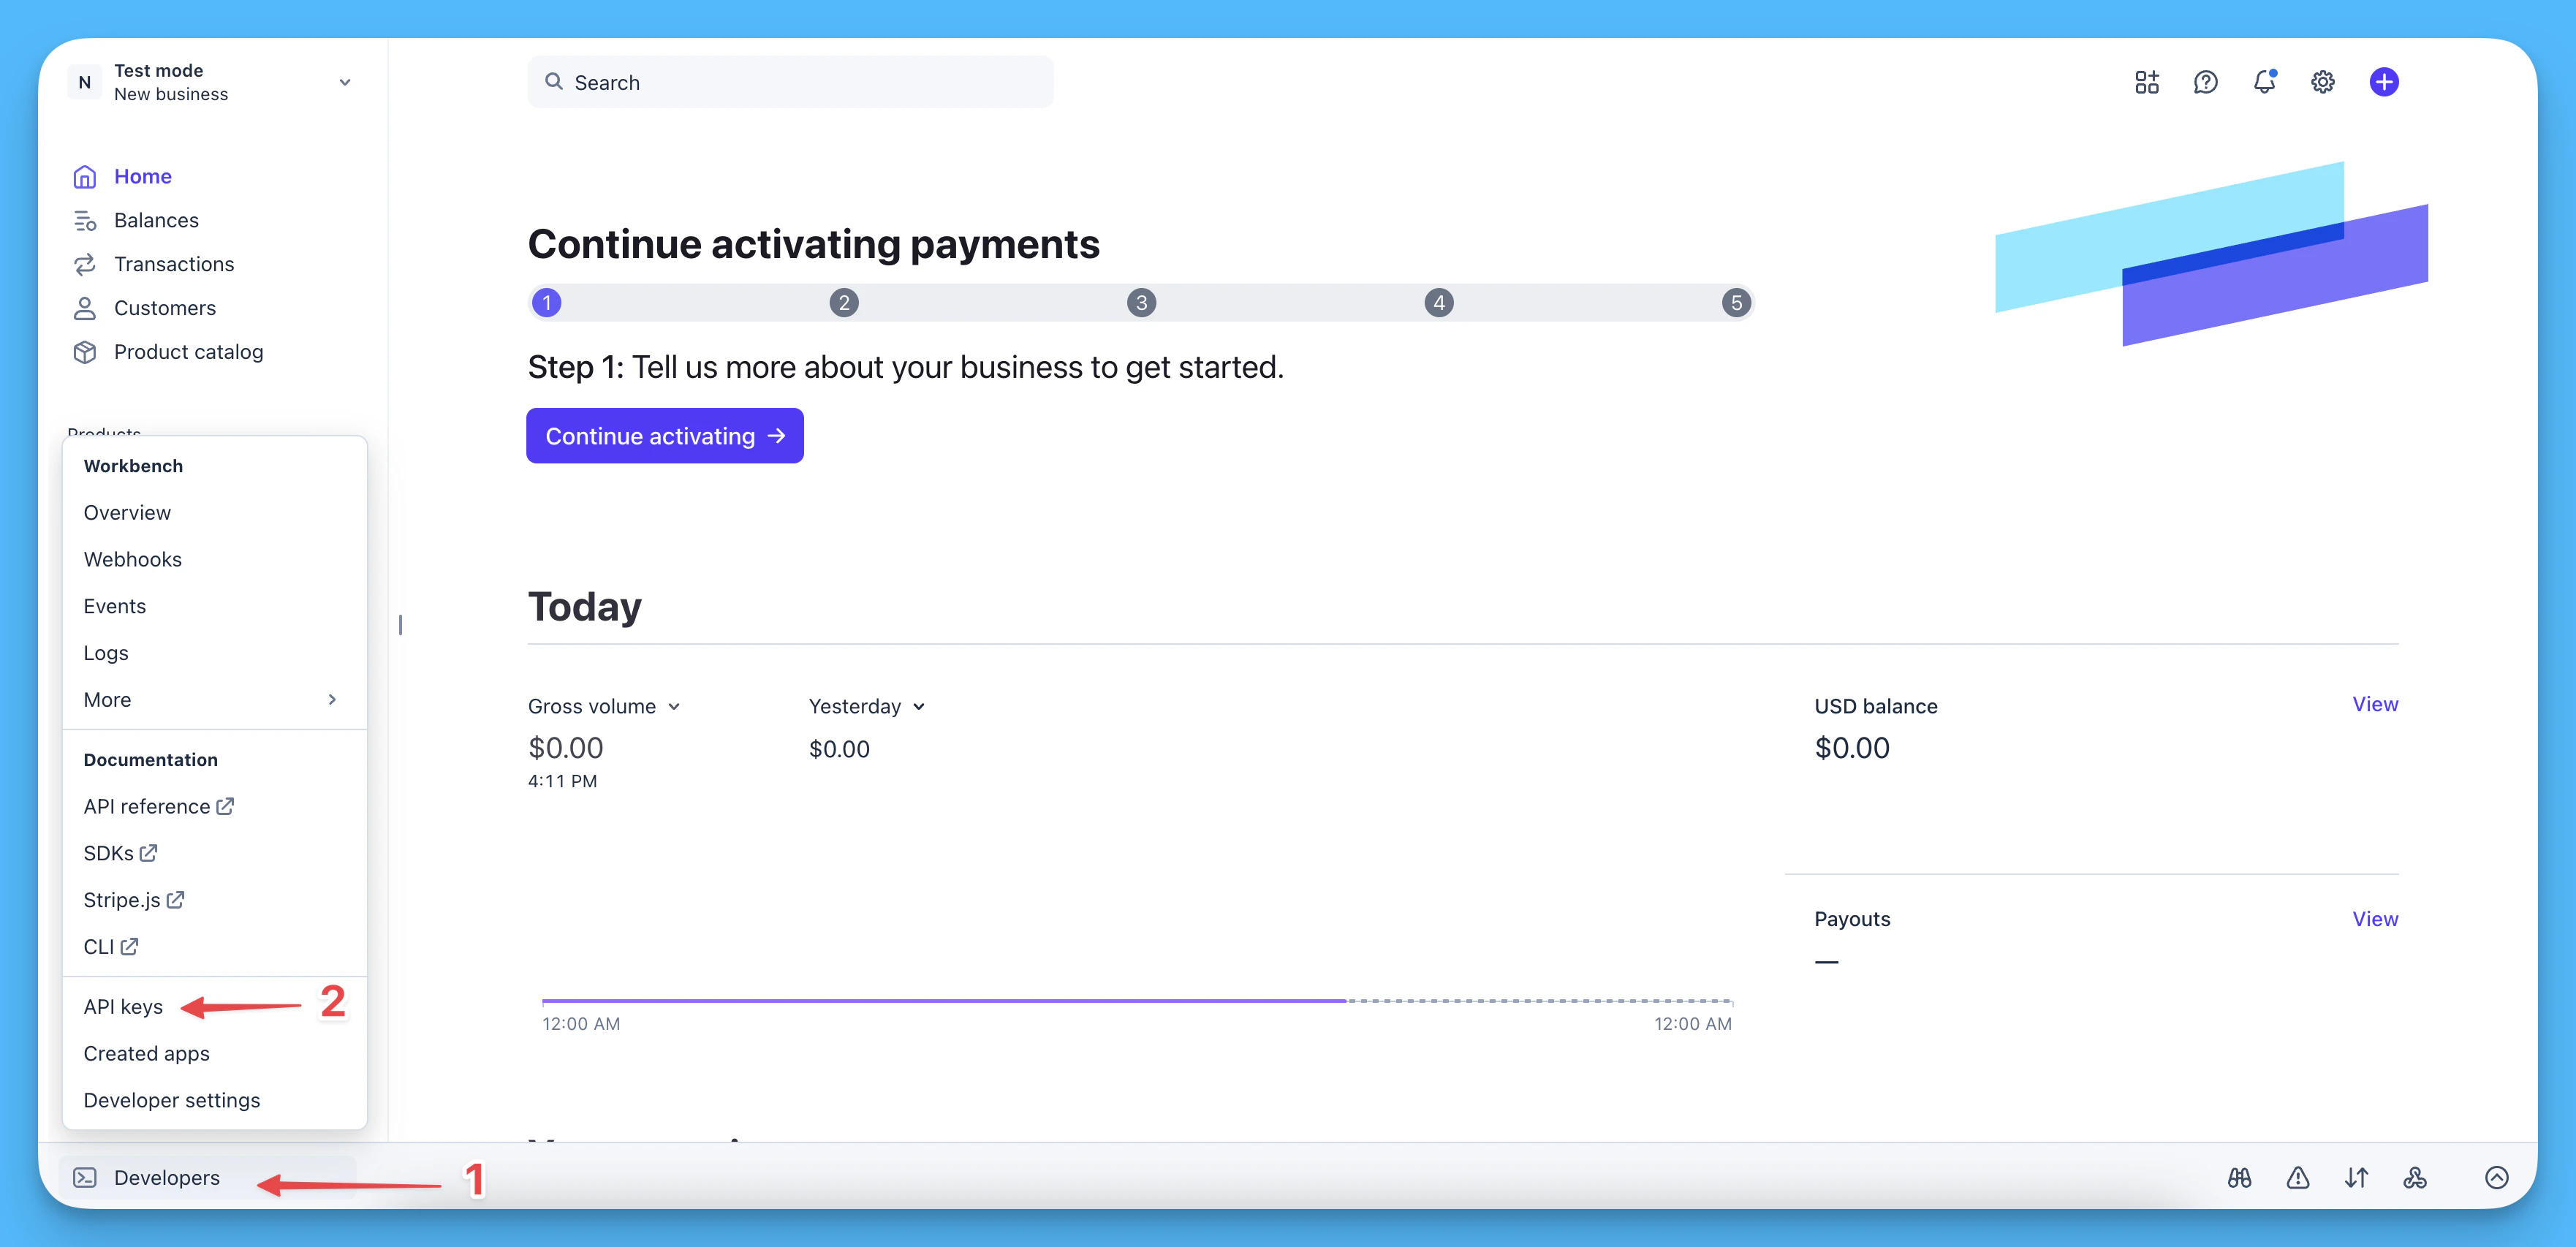
Log into your Stripe account, click **Developers**, then click **API keys** to [locate your API keys in the Dashboard](https://support.stripe.com/questions/locate-api-keys-in-the-dashboard).
## API Key Method
You can also connect your Stripe and Pagos accounts using a restricted API key. This method requires you to manually create an API key in the Stripe dashboard and enter it in Pagos.
### Step 1 – Create a Restricted API Key in Your Stripe Account
For added data security, use a restricted API key to connect your Stripe and Pagos accounts. If you don't already have one, you'll need to create one in the Stripe dashboard:
Log into your Stripe account, click **Developers**, then click **API keys** to [locate your API keys in the Dashboard](https://support.stripe.com/questions/locate-api-keys-in-the-dashboard).
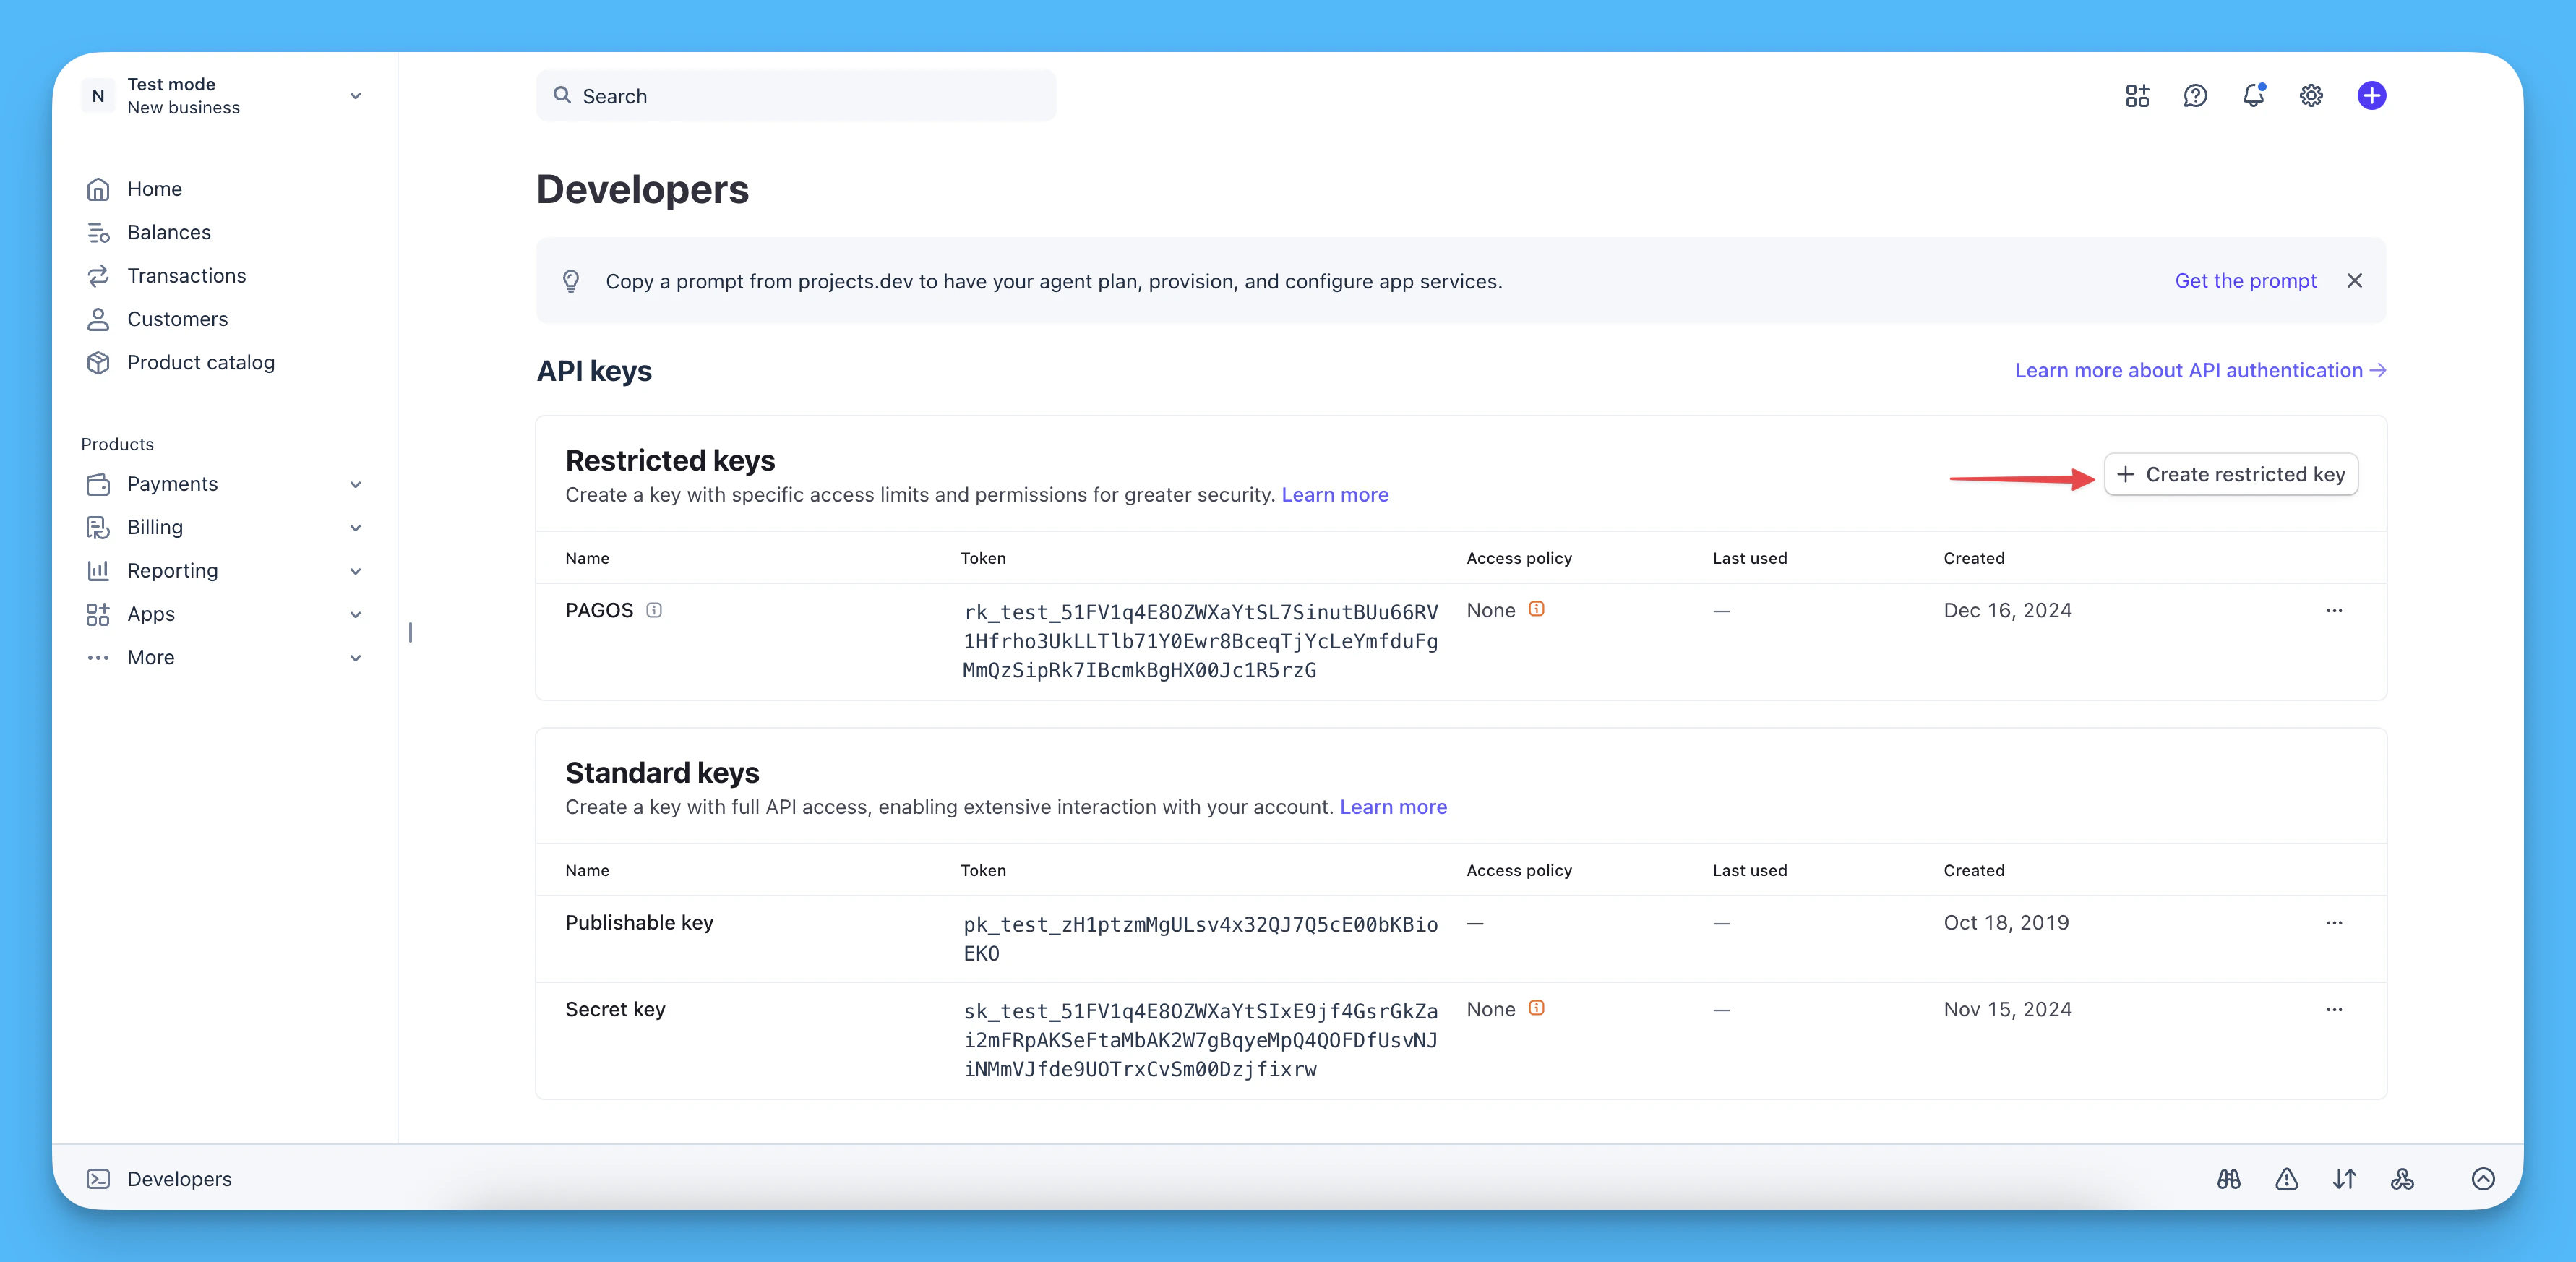
 In the **Restricted keys** section of the API keys page, click **Create restricted key**.
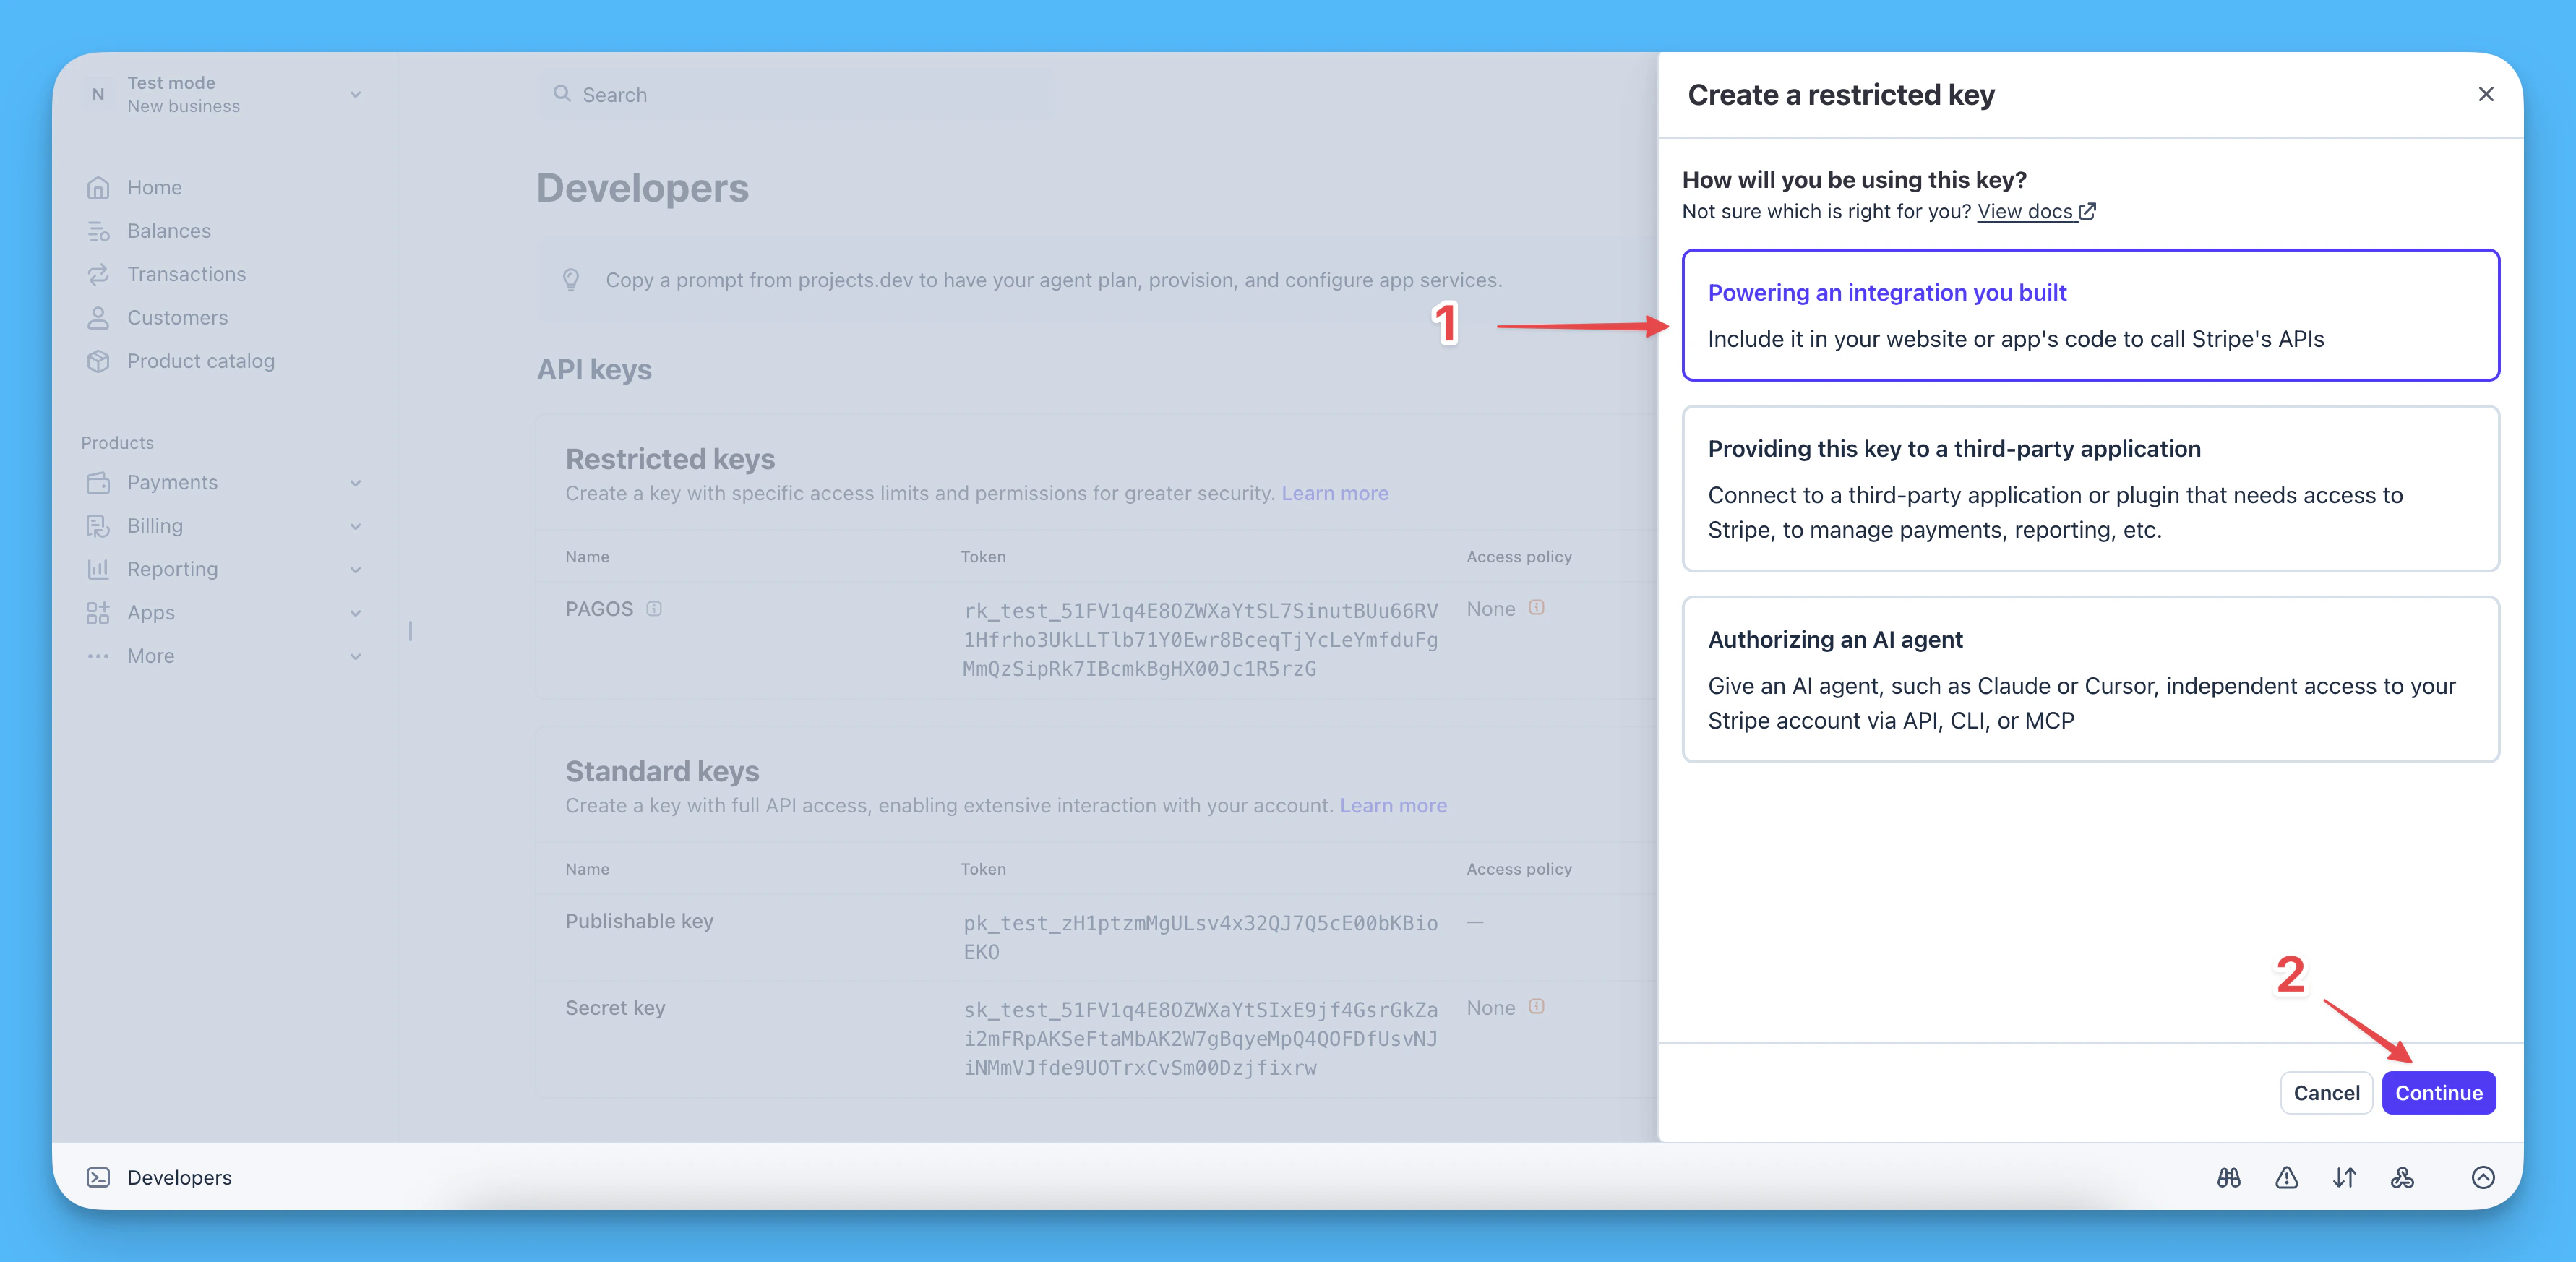
 Click **Powering an integration you built**, then click **Continue**.
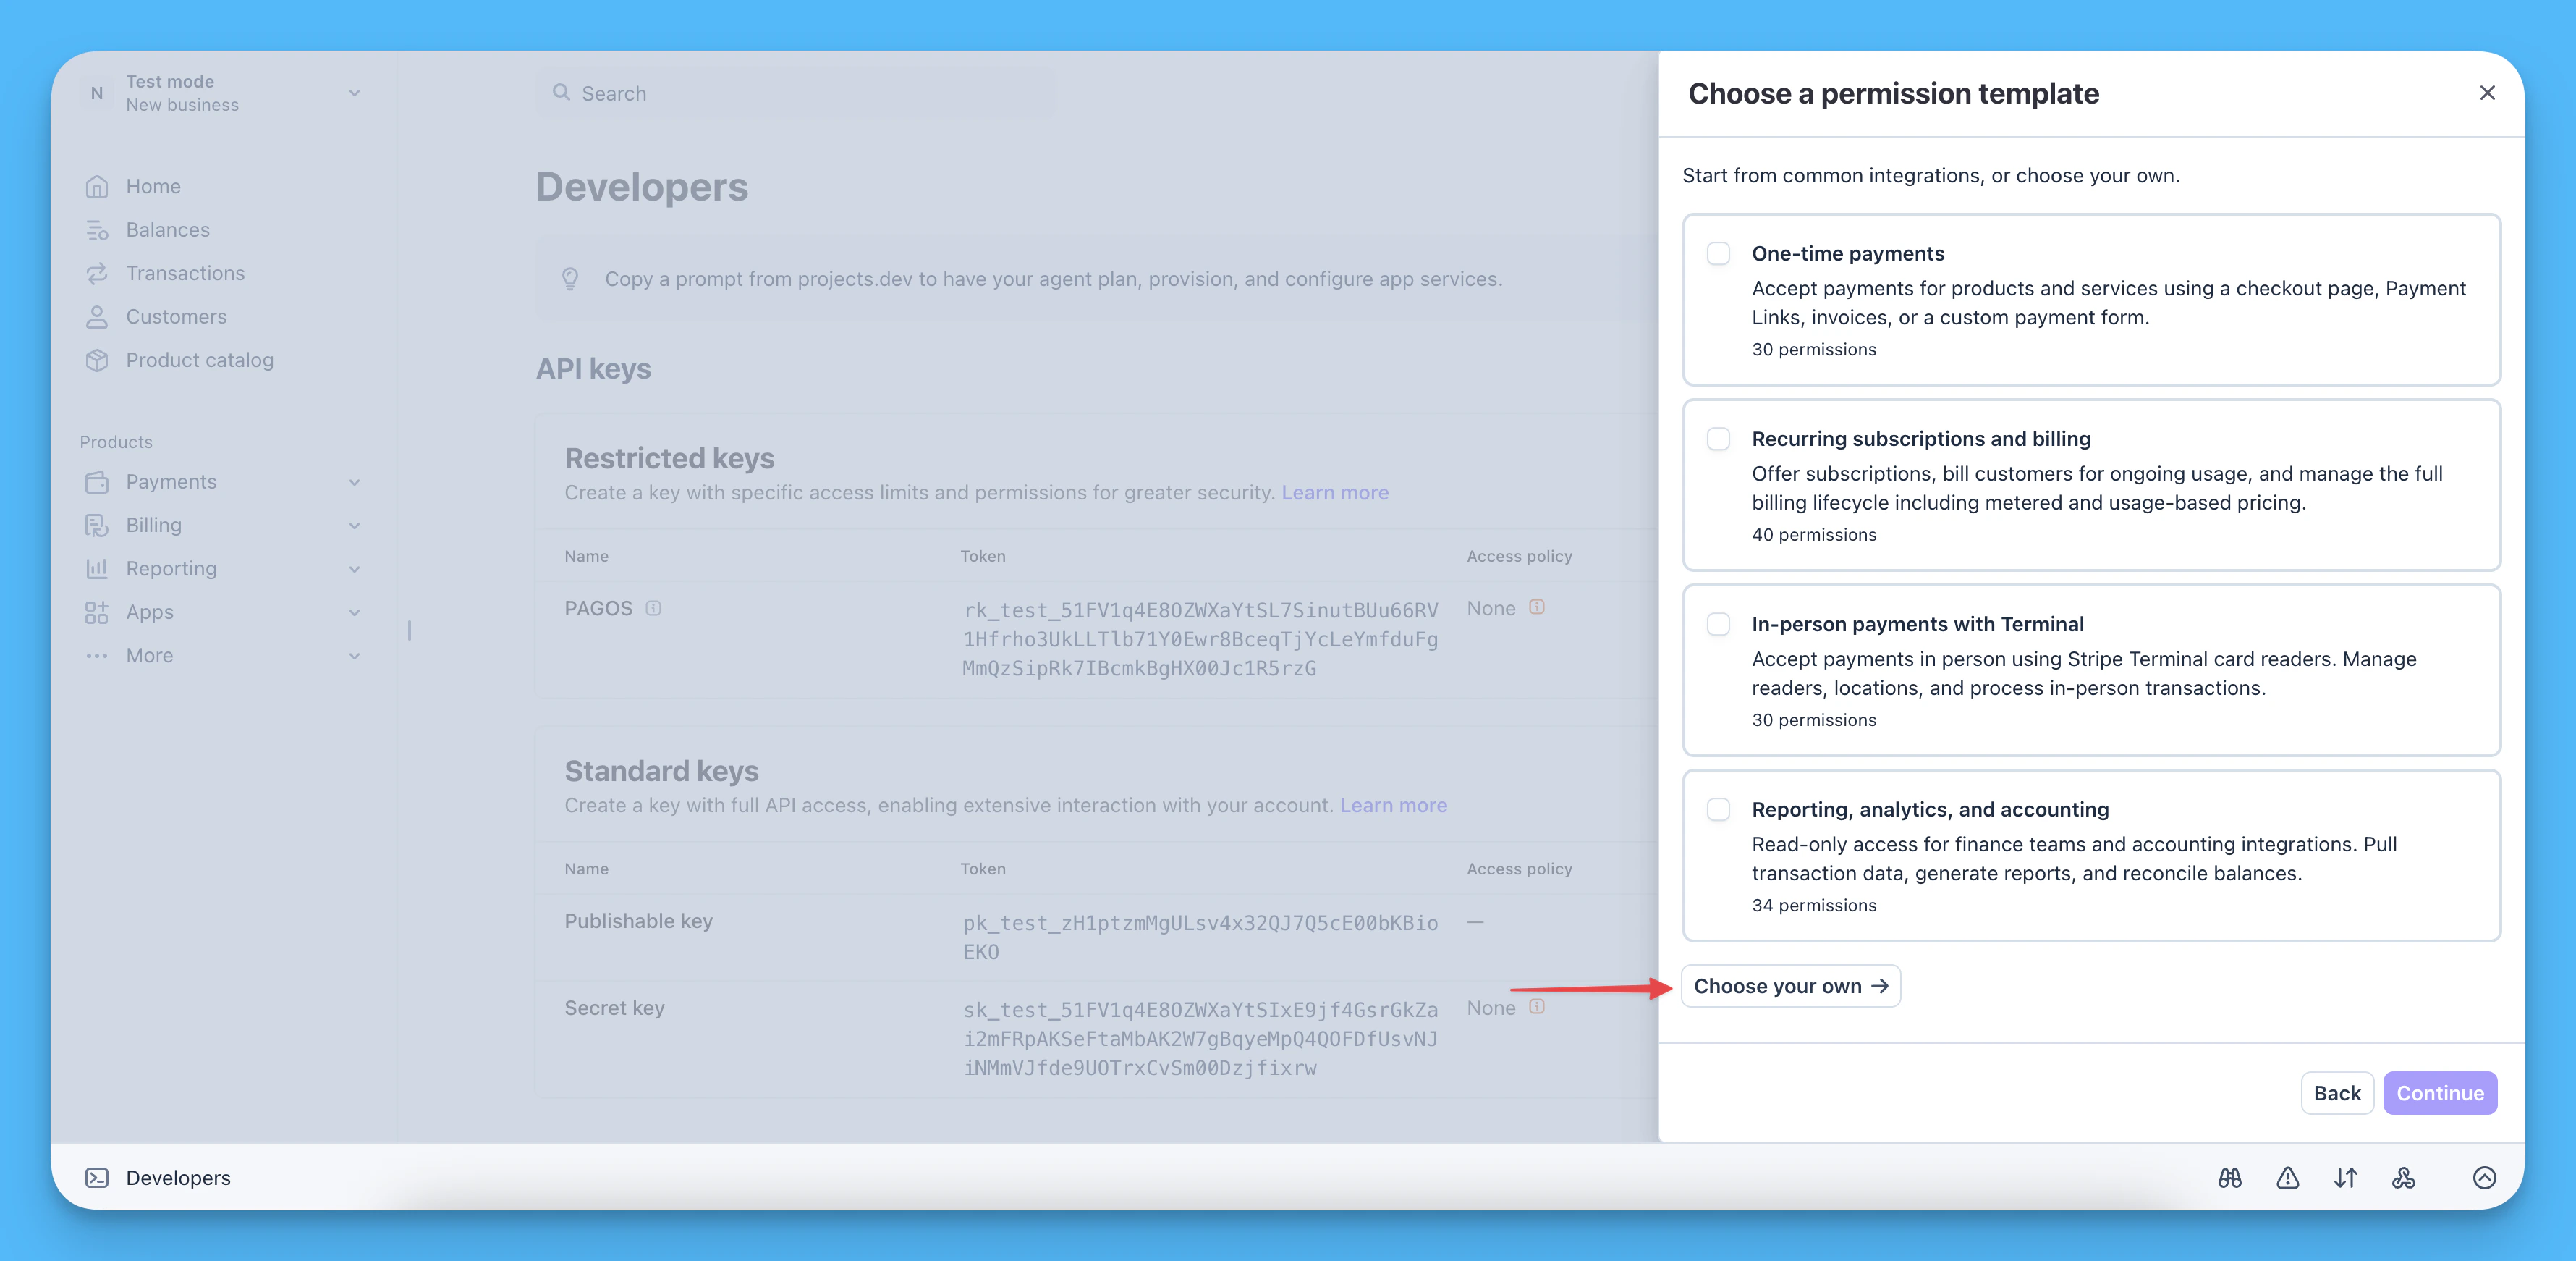
 Click **Choose your own**.
 Use the **Key name** field to name your API key.
Change the permissions for the following resources to **Read**:
* Balance
* Balance Transaction Sources
* Balance Transfers
* Charges and Refunds
* Events
* Files
* Payment Disputes
* Payment Intents
* Payment Methods
* Payouts
* Products
* Setup Intents
* Sources
* Tokens
* Credit notes
* Subscriptions
* Terminal SKUs
* Financial Reports
Change the permissions for **Webhook Endpoints, Event Destinations** to **Write**, then click **Create key**.
After you create the new restricted key, copy the following details for use in the next step:
* **Name**
* **Token**
### Step 2: Add a New Data Connection to Your Pagos Account
To pull in Stripe data to Pagos, you'll need to add a new data connection in your Pagos account:
[Log into your Pagos account](https://secure.pagos.ai/sign-in).
Click the **settings** icon in the top-right corner of the page.
Under **Data Connections**, click **Connections**.
Click **Add Data Connection**.
In the side panel that opens, click the **Processor** drop-down, then select **Stripe**.
Enter a **Data Connection Name**. This value is used for display and identification on charts, and can be whatever you prefer.
Enter the restricted **API key** from [Step 1](#step-1-create-a-restricted-api-key-in-your-stripe-account) above.
Click **Add Data Connection**.
## Troubleshooting Tips
* If you have already configured a webhook for your Stripe account to connect to Pagos, you will receive an error and will need to remove the old webhook so a new one can be generated.
* After importing your data from Stripe, confirm all BIN number and bank name data appears as expected in your Pagos account. If any data is missing, contact Stripe support and request they enable details on all webhooks.
Use the **Key name** field to name your API key.
Change the permissions for the following resources to **Read**:
* Balance
* Balance Transaction Sources
* Balance Transfers
* Charges and Refunds
* Events
* Files
* Payment Disputes
* Payment Intents
* Payment Methods
* Payouts
* Products
* Setup Intents
* Sources
* Tokens
* Credit notes
* Subscriptions
* Terminal SKUs
* Financial Reports
Change the permissions for **Webhook Endpoints, Event Destinations** to **Write**, then click **Create key**.
After you create the new restricted key, copy the following details for use in the next step:
* **Name**
* **Token**
### Step 2: Add a New Data Connection to Your Pagos Account
To pull in Stripe data to Pagos, you'll need to add a new data connection in your Pagos account:
[Log into your Pagos account](https://secure.pagos.ai/sign-in).
Click the **settings** icon in the top-right corner of the page.
Under **Data Connections**, click **Connections**.
Click **Add Data Connection**.
In the side panel that opens, click the **Processor** drop-down, then select **Stripe**.
Enter a **Data Connection Name**. This value is used for display and identification on charts, and can be whatever you prefer.
Enter the restricted **API key** from [Step 1](#step-1-create-a-restricted-api-key-in-your-stripe-account) above.
Click **Add Data Connection**.
## Troubleshooting Tips
* If you have already configured a webhook for your Stripe account to connect to Pagos, you will receive an error and will need to remove the old webhook so a new one can be generated.
* After importing your data from Stripe, confirm all BIN number and bank name data appears as expected in your Pagos account. If any data is missing, contact Stripe support and request they enable details on all webhooks.