> ## Documentation Index
> Fetch the complete documentation index at: https://docs.pagos.ai/llms.txt
> Use this file to discover all available pages before exploring further.
# Connect to Checkout.com
This guide outlines the necessary steps to connect your Pagos and Checkout.com accounts. For more information on connecting Pagos to other payment processors, see our [Connecting Your Payment Processors to Pagos](/importing-data/connecting-your-payment-processors-to-pagos) guide.
**Sensitive Data Warning**:
Never include sensitive customer data in the metadata fields passed to Pagos.
## Step 1 – Retrieve Your Client ID and Create a Secret API Key
### Retrieve Your Client ID
Your Checkout.com Client ID is required when adding the data connection in Pagos. To find it:
1. Sign in to the [Checkout.com Dashboard](https://dashboard.checkout.com/).
2. Click the **Settings** icon in the top-right corner.
3. Click **Account details**.
4. Under **Unique identifiers**, copy your **Client ID**.
You will need this value for [Step 3](#step-3-add-a-new-data-connection-to-your-pagos-account).
You must have the **Account owner** or **Admin** user role in Checkout.com to view the Client ID. If you can't find it, contact your Checkout.com account manager or [request support](https://support.checkout.com).
### Create a Secret API Key
For added data security, use a secret API key to connect your Checkout.com and Pagos accounts. If you don't already have one, you'll need to create one in the Checkout.com dashboard. Log into your Checkout.com account, then follow the process outlined in [Checkout.com's documentation](https://support.checkout.com/hc/en-us/articles/14327309405842-Create-new-API-keys) to locate your API keys.
While following the instructions in this guide, keep in mind the following:
* When selecting an API key, select **Secret API key** and add a description that identifies the key as a Pagos key
* Under **Scope**, navigate from **Default** to **Customize** and select the following checkboxes:
* balances:view
* disputes:view
* files
* financial-actions:view
* flow:events
* flow:workflows
* gateway
* payments:search
* reports
* reports:view
* risk
* If you have more than one Entity with Checkout.com, you'll need to create a new secret API key for each of your Entities. Use the **Entity** field to select which one you're generating a key for.
Copy your new Secret key(s) for use in the next step.
## Step 2 - Configure Reports in Your Checkout.com Account
From your Checkout.com account, configure each of the following report types individually:
* [Payments](https://www.checkout.com/docs/payments/retrieve-payment-reports/payments-report)
* [Disputes](https://www.checkout.com/docs/business-operations/manage-disputes/retrieve-dispute-reports/disputes-report)
* [Authentication](https://www.checkout.com/docs/payments/retrieve-payment-reports/authentication-report)
* [Real Time Account Updater Report](https://www.checkout.com/docs/payments/store-and-manage-credentials/retrieve-stored-credentials-reports/real-time-account-updater-report)
* [Fee Summary](https://www.checkout.com/docs/funds-management/retrieve-financial-reports/fee-summary-report)
* [Financial Actions](https://www.checkout.com/docs/funds-management/retrieve-financial-reports/balance-reports/financial-actions-by-date-range-report)
* [Payouts](https://www.checkout.com/docs/funds-management/retrieve-financial-reports/settlement-reports/payouts-report)
To do so, follow these steps for each report type:
Click **Reports** in the left navigation.
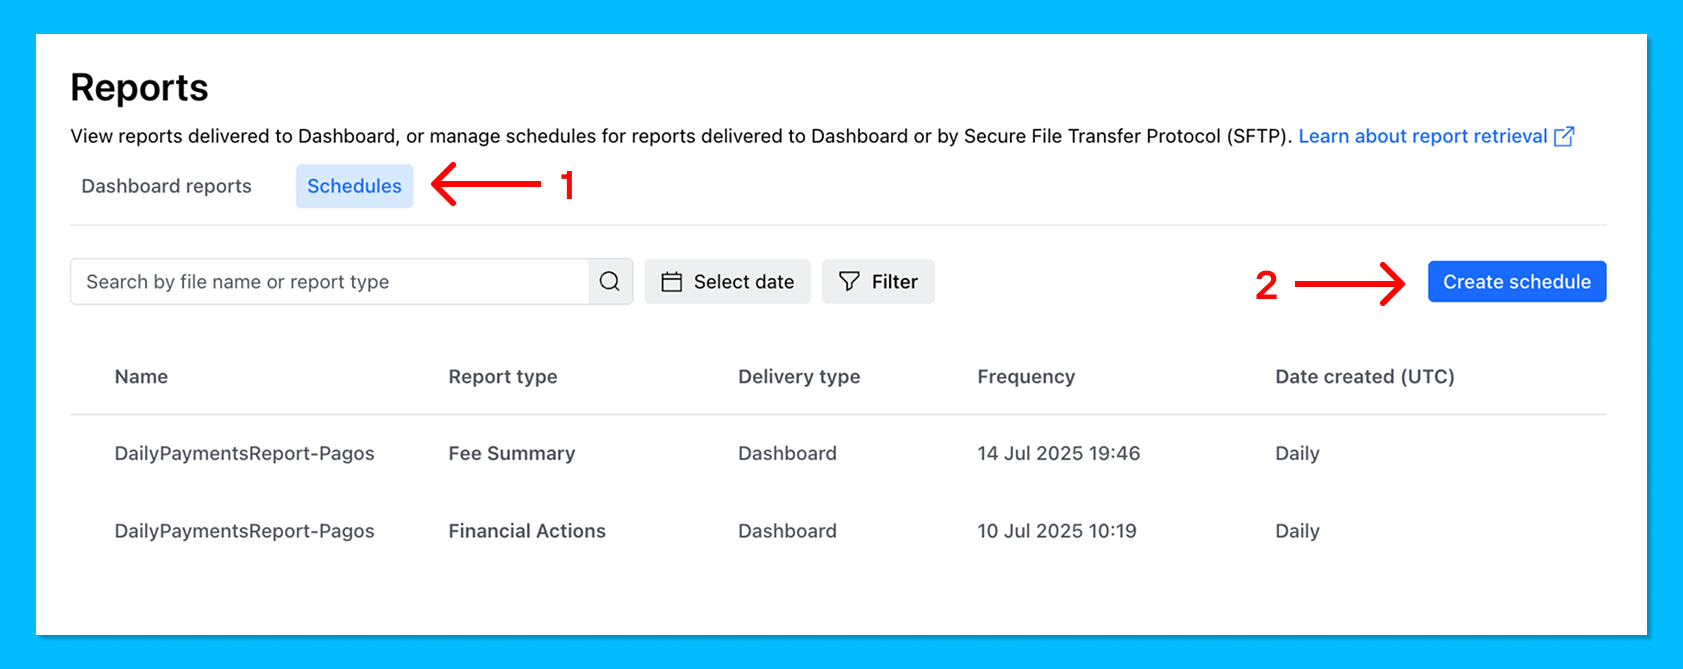
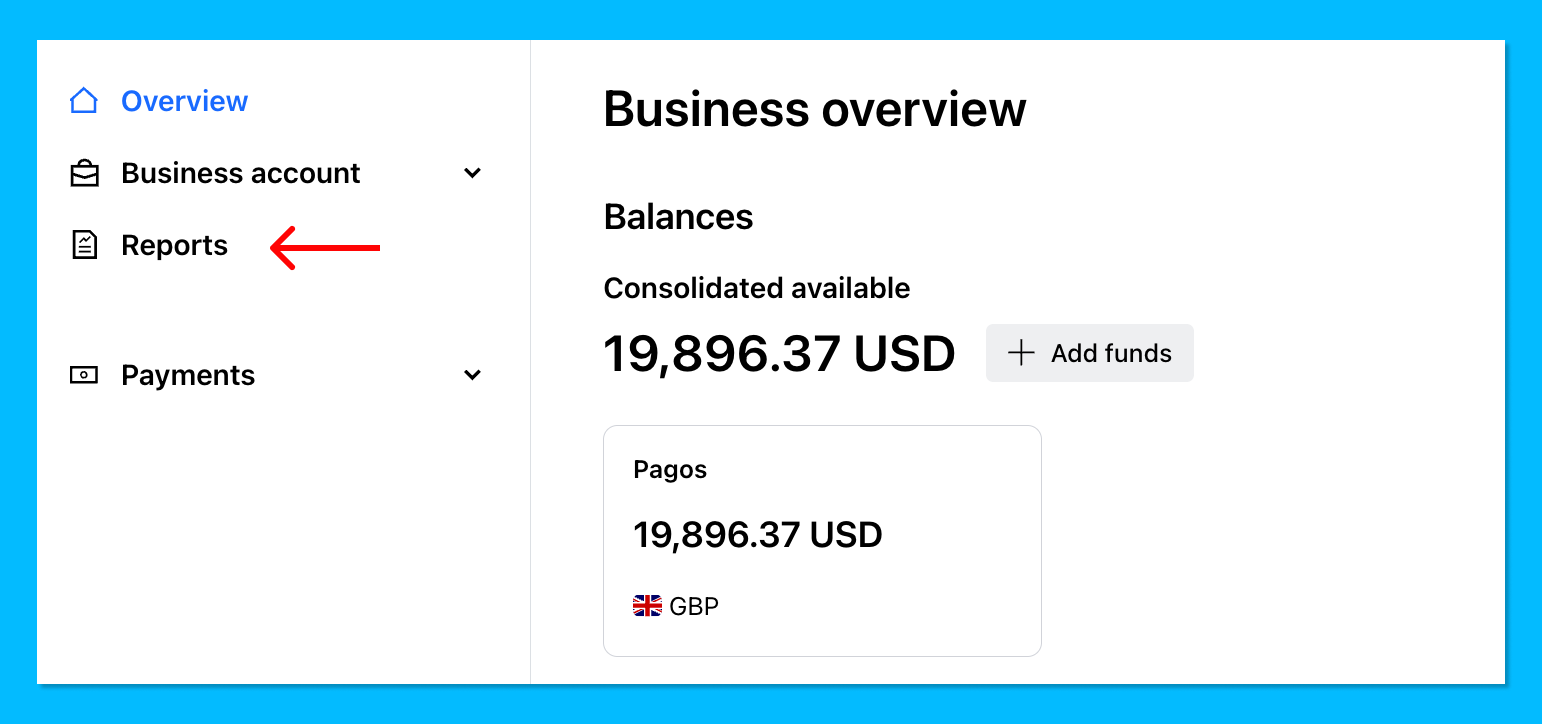 In the Reports section, click the **Schedules** tab, then click **Create Schedule**.
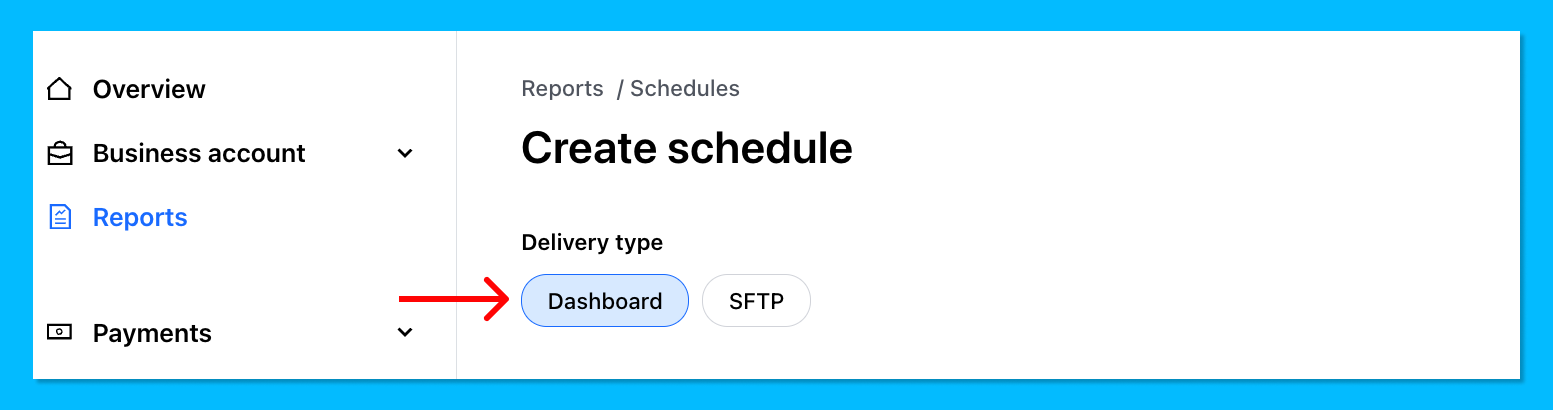
 Under **Delivery type**, select **Dashboard** as the report source.
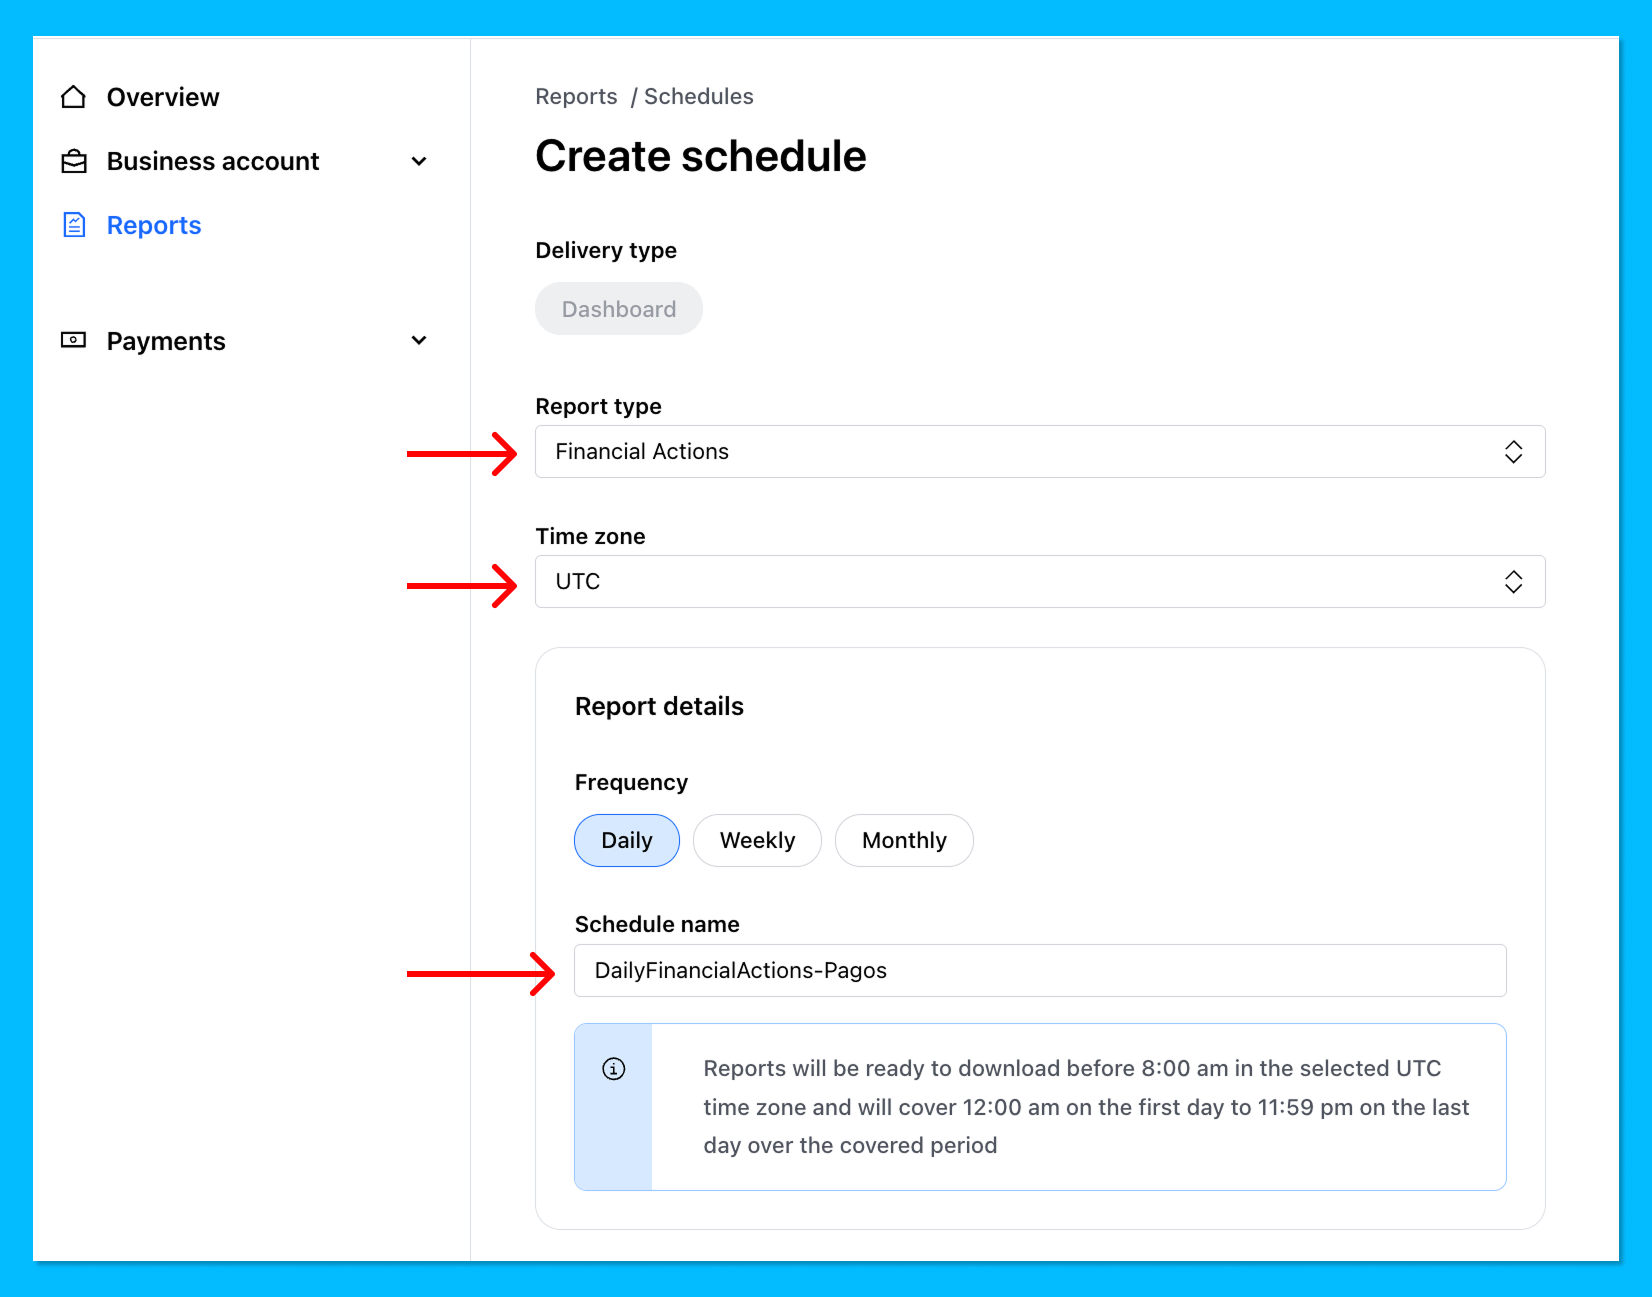
 Use the **Report type** dropdown to select the report.
If you have more than one Entity with Checkout.com you must configure the **Financial Actions** and **Payouts** reports for each Entity individually.
Configure the following settings:
* **Time Zone**: UTC
* **Frequency**: Daily.
* **Schedule name**: Rename it to match the report type (e.g. `DailyFinancialActions-Pagos`)
Use the **Report type** dropdown to select the report.
If you have more than one Entity with Checkout.com you must configure the **Financial Actions** and **Payouts** reports for each Entity individually.
Configure the following settings:
* **Time Zone**: UTC
* **Frequency**: Daily.
* **Schedule name**: Rename it to match the report type (e.g. `DailyFinancialActions-Pagos`)
 Under **Customize included fields**, click **Select all**, then deselect any fields that contain PII, such as:
* Billing address
* Shipping address
* Cardholder name
* Email
Click **Create**.
## Step 3 - Add a New Data Connection to Your Pagos Account
To pull in Checkout.com data to Pagos, add a new data connection in your Pagos account:
[Log into your Pagos account.](https://secure.pagos.ai/sign-in)
Click the **settings** icon in the top-right corner of the page.
Under **Data Connections**, click **Connections**.
Click **Add Data Connection**.
In the side panel that opens, click the **Provider** drop-down, then select **Checkout.com**.
Enter a **Data Connection Name**. This value is used for display and identification on charts, and can be whatever you prefer.
Enter the **Client ID** from [Step 1](#retrieve-your-client-id).
Enter a **Secret Key** from [Step 1](#create-a-secret-api-key). If you have more than one Entity with Checkout.com, enter the Secret Key for the Entity with the lowest transaction volume, then securely send the full list of Secret keys to your Pagos Implementation Manager.
Click **Add Data Connection**.
## Step 4 - Create a Webhook
From the **Data Connections** page, click the *...* in the top-right corner of your new Checkout Connection card. Click **Copy Webhook Destination** to copy your webhook desitnation URL. Next, log into your Checkout.com account to create the webhook:
In your Checkout.com dashboard, click **Developers** in the left navigation, then click **Webhooks**.
Click **Create configuration**.
Enter a **Name** for the webhook (e.g. "Pagos").
Paste the destination URL you copied from your Pagos account into the **Endpoint URL** field.
Under **Events**, select **all events** within each of the following categories:
* **Reports**
* **Disputes**
* **Fraud**
* **Gateway**
Under **Entities and processing channels**, select all the Entities you created Secret keys for.
Click **Create webhook**.
Under **Customize included fields**, click **Select all**, then deselect any fields that contain PII, such as:
* Billing address
* Shipping address
* Cardholder name
* Email
Click **Create**.
## Step 3 - Add a New Data Connection to Your Pagos Account
To pull in Checkout.com data to Pagos, add a new data connection in your Pagos account:
[Log into your Pagos account.](https://secure.pagos.ai/sign-in)
Click the **settings** icon in the top-right corner of the page.
Under **Data Connections**, click **Connections**.
Click **Add Data Connection**.
In the side panel that opens, click the **Provider** drop-down, then select **Checkout.com**.
Enter a **Data Connection Name**. This value is used for display and identification on charts, and can be whatever you prefer.
Enter the **Client ID** from [Step 1](#retrieve-your-client-id).
Enter a **Secret Key** from [Step 1](#create-a-secret-api-key). If you have more than one Entity with Checkout.com, enter the Secret Key for the Entity with the lowest transaction volume, then securely send the full list of Secret keys to your Pagos Implementation Manager.
Click **Add Data Connection**.
## Step 4 - Create a Webhook
From the **Data Connections** page, click the *...* in the top-right corner of your new Checkout Connection card. Click **Copy Webhook Destination** to copy your webhook desitnation URL. Next, log into your Checkout.com account to create the webhook:
In your Checkout.com dashboard, click **Developers** in the left navigation, then click **Webhooks**.
Click **Create configuration**.
Enter a **Name** for the webhook (e.g. "Pagos").
Paste the destination URL you copied from your Pagos account into the **Endpoint URL** field.
Under **Events**, select **all events** within each of the following categories:
* **Reports**
* **Disputes**
* **Fraud**
* **Gateway**
Under **Entities and processing channels**, select all the Entities you created Secret keys for.
Click **Create webhook**.